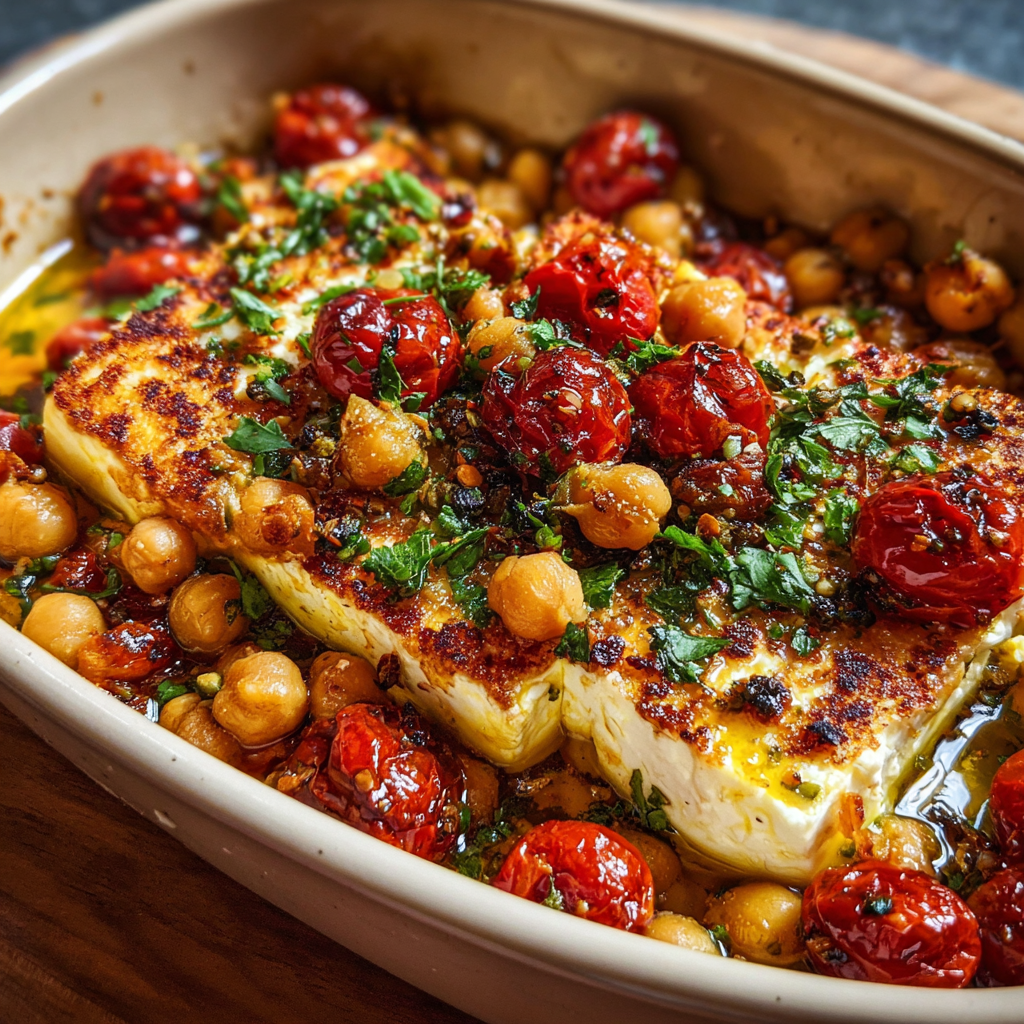
Baked Feta Chickpeas

If you’re searching for a snack that effortlessly combines bold flavors with wholesome ingredients, Baked Feta Chickpeas are your new go-to treat. This simple yet irresistible recipe blends creamy, salty feta cheese with crispy roasted chickpeas, creating a deliciously satisfying snack that’s easy to whip up anytime you crave something tasty and nutritious. Perfect for a quick bite, a party appetizer, or even a light lunch, Baked Feta Chickpeas are a must-try that will brighten up your snacking game.
Why You’ll Love This Recipe
- Quick and easy to make: This recipe comes together in under 30 minutes, making it perfect for busy days or last-minute cravings.
- Healthy and satisfying: Packed with protein and fiber from chickpeas and calcium from feta, it’s a smart snack choice.
- Flavor-packed combo: The creamy, tangy feta pairs perfectly with the nutty roasted chickpeas for a delightful taste explosion.
- Versatile snack option: Enjoy it on its own, as a salad topper, or alongside your favorite dips.
- Great for all diets: Naturally gluten-free and easy to make vegetarian or vegan with simple swaps.
Ingredients You’ll Need
Using simple pantry staples, this recipe achieves a perfect balance of flavors and textures without any fuss. Each ingredient plays a special role in creating the dish’s unique character.
- Chickpeas: Use canned or cooked chickpeas for that crunchy, protein-rich base.
- Feta cheese: Choose a good-quality block of feta that bakes beautifully into a creamy, golden topping.
- Olive oil: Adds a subtle richness and helps crisp the chickpeas during baking.
- Garlic powder: Enhances the savory depth of the snack with its aromatic punch.
- Smoked paprika: Brings a warm, smoky flavor that complements both chickpeas and feta.
- Fresh herbs: Optional, but parsley or thyme add a fresh color and boost of flavor.
- Lemon zest or juice: Adds brightness and balances the richness with a touch of acidity.
- Salt and pepper: Essential for seasoning and bringing all elements together.
Variations for Baked Feta Chickpeas
Feel free to get creative and tailor Baked Feta Chickpeas to your taste buds or dietary needs. This recipe is wonderfully adaptable, allowing you to experiment with different flavors and textures.
- Spicy twist: Add a pinch of cayenne pepper or red chili flakes for an exciting kick.
- Herb-infused: Swap fresh herbs like rosemary or oregano to change up the flavor profile.
- Vegan version: Replace feta with a plant-based cheese alternative for a dairy-free snack.
- Nutty crunch: Toss in some toasted pine nuts or slivered almonds before baking.
- Lemon-garlic zest: Increase lemon juice and fresh garlic for a zesty, fragrant option.
How to Make Baked Feta Chickpeas
Step 1: Preheat the oven
Set your oven to 400°F (200°C). This temperature is perfect for roasting the chickpeas until crispy while gently baking the feta into a creamy golden texture.
Step 2: Prepare the chickpeas
Drain and rinse canned chickpeas, then pat them dry thoroughly using a towel; dry chickpeas achieve the best crispiness when baked.
Step 3: Season the chickpeas
Toss the dried chickpeas with olive oil, garlic powder, smoked paprika, salt, and pepper until evenly coated for a flavorful base.
Step 4: Arrange in the baking dish
Place the seasoned chickpeas in a single layer on a baking tray or oven-safe dish. Nestle the block of feta cheese right in the center or among the chickpeas.
Step 5: Bake and watch carefully
Bake for about 20-25 minutes, rotating halfway through. The chickpeas should be golden and crisp, and the feta will be soft and bubbling with lightly browned edges.
Step 6: Add finishing touches
Once out of the oven, sprinkle fresh herbs and lemon zest or juice over the top to brighten the dish and add a fresh finishing flavor.
Pro Tips for Making Baked Feta Chickpeas
- Dry chickpeas thoroughly: Moisture prevents crispiness, so ensure chickpeas are completely dry before baking.
- Use a block of feta: Crumbled feta won’t bake as smoothly as a whole block, which gets creamy and melts slowly.
- Don’t overcrowd the pan: Arrange chickpeas in a single layer to allow even roasting and avoid steaming.
- Check bake time carefully: Chickpeas can go from perfectly crispy to burnt quickly, so keep an eye starting at 20 minutes.
- Fresh herbs at the end: Add herbs after baking to keep their vibrant color and fresh flavor intact.
How to Serve Baked Feta Chickpeas
Garnishes
Top with fresh parsley, thyme, or a sprinkle of chili flakes to add a pop of color and enhance flavor layers, making your snack look as good as it tastes.
Side Dishes
Pair Baked Feta Chickpeas with crisp salads, warm pita bread, or roasted vegetables for a balanced and delicious meal or appetizer spread.
Creative Ways to Present
Serve in a rustic bowl with a drizzle of extra virgin olive oil and a wedge of lemon on the side, or use as a topping for grain bowls and Mediterranean-inspired dishes.
Make Ahead and Storage
Storing Leftovers
Keep leftovers in an airtight container in the refrigerator for up to 3 days. Re-crisp chickpeas in the oven before serving to revive texture.
Freezing
While baked feta tends to lose creaminess after freezing, you can freeze the roasted chickpeas separately for up to 1 month and re-bake later for a crunchy snack.
Reheating
Reheat gently in an oven or toaster oven at 350°F (175°C) for 5-7 minutes. Avoid microwaving as it can cause sogginess in the chickpeas and feta.
FAQs
Can I use dried chickpeas instead of canned?
Yes! Just soak dried chickpeas overnight and cook them until tender before drying and roasting as instructed for the best results.
What type of feta cheese is best?
Choose a firm, block-style feta packed in brine rather than crumbled feta; this bakes better and melts into a creamy texture.
Is this recipe gluten-free?
Absolutely. Both chickpeas and feta contain no gluten, making this a naturally gluten-free snack option.
Can I make this recipe vegan?
Yes, swap the feta cheese for a vegan cheese alternative that melts well, or use marinated tofu for a similar texture and flavor.
How long do baked feta chickpeas stay fresh?
Stored properly in an airtight container in the fridge, they stay fresh for up to 3 days, though crispness is best right after baking.
Final Thoughts
Baked Feta Chickpeas are one of those magical recipes that feel like a special treat but come together quickly with just a handful of ingredients. Whether you’re looking for a healthy snack, a flavorful appetizer, or a fun way to jazz up your meals, this recipe fits the bill perfectly. I can’t wait for you to try it and discover why so many fall in love with this irresistible combination. Happy baking and snacking!
Related Posts
PrintBaked Feta Chickpeas

Baked Feta Chickpeas combine creamy, salty feta cheese with crispy roasted chickpeas for a bold, wholesome, and flavor-packed snack. Ready in under 30 minutes, this healthy and versatile dish is perfect for quick bites, appetizers, or light lunches with a balance of protein, fiber, and calcium. Naturally gluten-free and easily adaptable for vegan diets, it’s a nutritious treat to boost your snacking game.
- Prep Time: 10 minutes
- Cook Time: 20-25 minutes
- Total Time: 30-35 minutes
- Yield: 2-3 servings 1x
- Category: Appetizers
- Method: Baking
- Cuisine: Mediterranean
- Diet: Gluten Free
Ingredients
Main Ingredients
- 1 can (15 oz) chickpeas, drained and rinsed
- 1 block (about 7 oz) feta cheese
- 2 tbsp olive oil
- 1 tsp garlic powder
- 1 tsp smoked paprika
- Salt and black pepper, to taste
Optional Add-ins and Garnishes
- Fresh parsley or thyme, chopped
- Lemon zest or 1 tbsp lemon juice
- Pinch of cayenne pepper or red chili flakes (for spicy twist)
- Toasted pine nuts or slivered almonds (for nutty crunch)
Instructions
- Preheat the oven: Set your oven to 400°F (200°C). This temperature is ideal for roasting chickpeas until crispy and gently baking the feta into a creamy, golden texture.
- Prepare the chickpeas: Drain and rinse canned chickpeas thoroughly, then pat them completely dry with a towel to ensure they will crisp up during baking.
- Season the chickpeas: Toss the dried chickpeas with olive oil, garlic powder, smoked paprika, salt, and pepper until evenly coated, building a flavorful base.
- Arrange in the baking dish: Spread the seasoned chickpeas in a single layer on a baking tray or oven-safe dish. Nestle the block of feta cheese in the center or among the chickpeas.
- Bake and watch carefully: Bake for 20-25 minutes, rotating the tray halfway through. The chickpeas should turn golden and crisp, while the feta becomes soft, bubbling, and lightly browned on the edges.
- Add finishing touches: Once out of the oven, sprinkle fresh herbs and lemon zest or juice over the top to brighten the flavor and add a fresh finishing touch.
Notes
- Dry chickpeas thoroughly before baking to achieve maximum crispiness.
- Use a block of feta rather than crumbled feta for a smoother, creamier bake.
- Arrange chickpeas in a single layer to avoid steaming and ensure even roasting.
- Keep an eye on baking time starting at 20 minutes to prevent burning.
- Add fresh herbs after baking to maintain vibrant color and fresh flavor.
- For vegan option: swap feta with a plant-based cheese alternative that melts well.
- Reheat leftovers in oven or toaster oven at 350°F (175°C) for 5-7 minutes to revive crispiness.
- Freeze roasted chickpeas separately for up to 1 month; avoid freezing baked feta for best texture.
Nutrition
- Serving Size: 1/3 recipe
- Calories: 220 kcal
- Sugar: 2 g
- Sodium: 400 mg
- Fat: 14 g
- Saturated Fat: 6 g
- Unsaturated Fat: 7 g
- Trans Fat: 0 g
- Carbohydrates: 15 g
- Fiber: 5 g
- Protein: 9 g
- Cholesterol: 25 mg
Keywords: baked feta chickpeas, roasted chickpeas, feta snack, healthy snack, gluten free appetizer, Mediterranean snack, vegetarian snack