Red Velvet Marbled Waffles
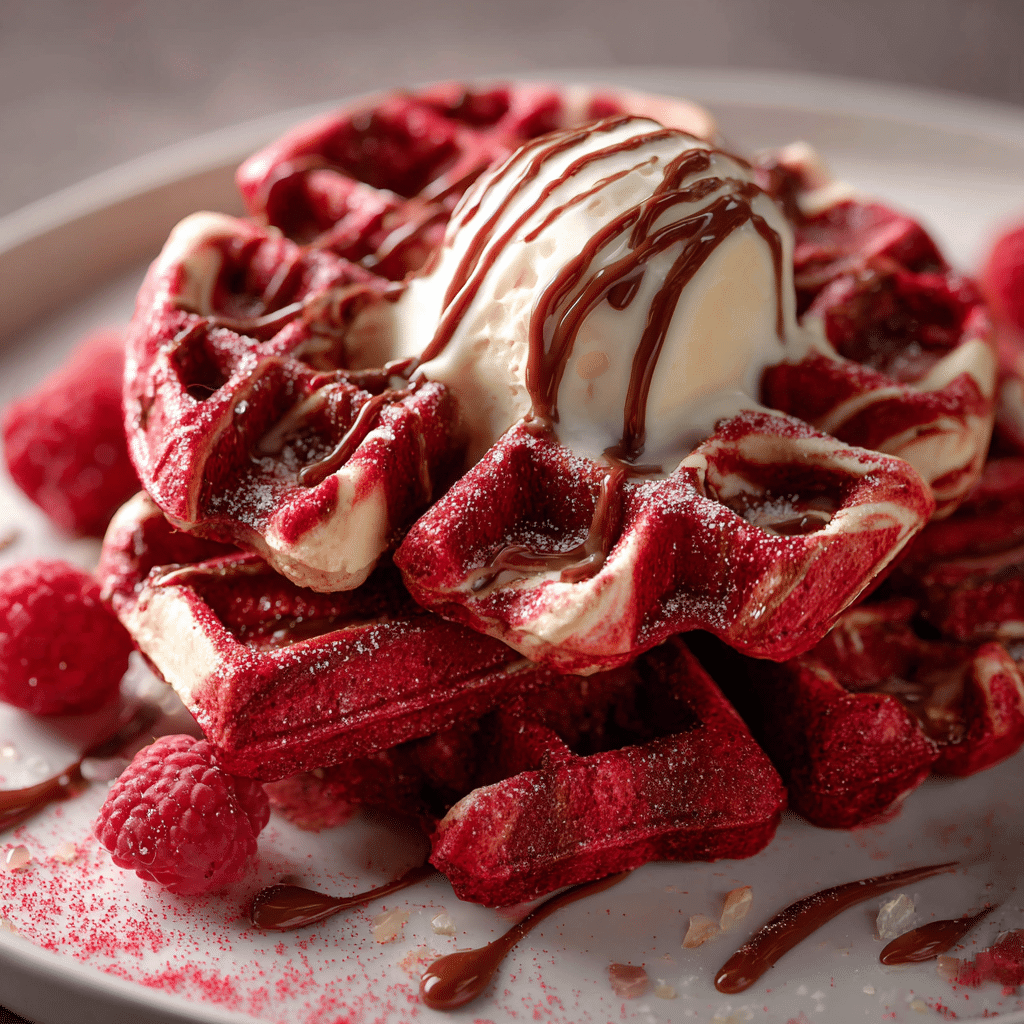
If you’re craving something truly special for breakfast or brunch, you can’t go wrong with Red Velvet Marbled Waffles. This recipe marries the rich, velvety flavor of classic red velvet cake with the light, crispy texture of homemade waffles, creating a show-stopping dish that’s as beautiful as it is delicious. With swirls of vibrant red and creamy batter, these waffles deliver a perfect balance of sweetness and fluffiness, guaranteed to impress your family or guests and brighten up any morning.
Why You’ll Love This Recipe
- Unique Flavor Combination: The blend of cocoa and tangy buttermilk gives these waffles a delightful red velvet taste that’s both comforting and indulgent.
- Eye-Catching Presentation: The marbled effect creates stunning red and white swirls, adding a flair of elegance to your breakfast table.
- Light and Fluffy Texture: Unlike dense cake, these waffles stay crisp on the outside and airy inside, making every bite a joy.
- Easy to Customize: You can easily adjust the recipe to suit dietary preferences or add fun mix-ins for even more variety.
- Perfect for Any Occasion: Whether it’s a weekend treat or a special brunch, these Red Velvet Marbled Waffles make mornings memorable.
Ingredients You’ll Need
This Red Velvet Marbled Waffles recipe relies on simple, wholesome ingredients that contribute to its signature taste, texture, and vibrant color. From the richness of buttermilk to the deep cocoa powder and smooth cream cheese, every element plays its part perfectly.
- All-purpose Flour: The base of your waffle batter, providing structure and body.
- Cocoa Powder: Adds the classic chocolate flavor essential for red velvet.
- Granulated Sugar: Sweetens the batter evenly without overpowering.
- Buttermilk: Offers moisture and a subtle tang that enhances flavor and tenderness.
- Eggs: Help bind ingredients and contribute to a fluffy texture.
- Vegetable Oil: Keeps waffles moist and crisp on the outside.
- Red Food Coloring: Provides that iconic red shade synonymous with red velvet.
- Baking Powder & Baking Soda: Gain lift and lightness, making waffles fluffy.
- Vanilla Extract: Enhances the overall flavor complexity.
- Cream Cheese (for serving or drizzle): Adds a tangy creaminess to complement the sweet waffles.
Variations for Red Velvet Marbled Waffles
Feel free to tailor this Red Velvet Marbled Waffles recipe to your taste or dietary needs. It’s incredibly adaptable and easy to experiment with so you can create your perfect brunch creation.
- Vegan Version: Substitute eggs with flax eggs and use plant-based milk for a dairy-free variation.
- Gluten-Free: Swap regular flour with a gluten-free flour blend to keep waffles safe for gluten sensitivities.
- Chocolate Chips: Add mini chocolate chips to the batter for bursts of melty chocolate.
- Spiced Twist: Mix in a pinch of cinnamon or nutmeg to give warmth and depth.
- Berry Swirls: Fold in raspberry or strawberry puree to complement the red velvet with fruity brightness.

How to Make Red Velvet Marbled Waffles
Step 1: Prepare the Batter
In a large bowl, whisk together the dry ingredients: flour, cocoa powder, sugar, baking powder, baking soda, and a pinch of salt. In a separate bowl, combine wet ingredients including buttermilk, eggs, vegetable oil, vanilla extract, and red food coloring. Gradually mix wet into dry until just combined; do not overmix to keep the waffles tender.
Step 2: Create the Marble Effect
Divide the batter into two portions. Leave one batch plain, and in the other, add a small amount of cream cheese or a lighter batter to swirl with the red velvet batter. Using a spoon or swirl knife, gently combine portions in the waffle iron to create the marbled pattern.
Step 3: Cook the Waffles
Preheat your waffle iron and lightly grease it. Pour the marbled batter onto the iron, spreading carefully without blending colors too much. Close the lid and cook according to your waffle maker’s instructions until crispy and cooked through, usually 3-5 minutes.
Step 4: Serve Warm and Enjoy
Remove waffles gently and serve immediately with your favorite toppings like cream cheese glaze, fresh berries, or whipped cream for an irresistible brunch treat.
Pro Tips for Making Red Velvet Marbled Waffles
- Preheat Properly: Make sure your waffle iron is hot enough before pouring batter to get a perfect crispy exterior.
- Don’t Overmix: Mixing the batter just until combined keeps waffles fluffy rather than chewy.
- Use Room Temperature Ingredients: This helps the batter combine smoothly, preventing lumps.
- Test Your Waffle Iron: Adjust cooking time based on how your specific iron heats and cooks to avoid undercooked waffles.
- Gentle Swirling: For the best marbled look, swirl the batters lightly—overmixing will dull the vibrant red design.
How to Serve Red Velvet Marbled Waffles
Garnishes
Top these waffle beauties with cream cheese frosting drizzle, a dollop of whipped cream, or a dusting of powdered sugar. Fresh strawberries or raspberries add a refreshing contrast, while chopped nuts bring delightful crunch.
Side Dishes
Serve alongside crispy bacon or sausages for a savory complement. Fresh fruit salad, yogurt, or a simple green salad balance the richness and create a well-rounded meal.
Creative Ways to Present
Stack your Red Velvet Marbled Waffles in a tall tower for an impressive centerpiece, or cut them into bite-sized pieces and serve with dipping sauces like chocolate ganache or cream cheese glaze for a fun brunch experience.
Make Ahead and Storage
Storing Leftovers
Place any leftover waffles in an airtight container and refrigerate for up to 3 days. To maintain crispiness, separate layers with parchment paper.
Freezing
Allow waffles to cool completely, then freeze individually on a baking sheet before transferring to a freezer bag. This prevents them from sticking together and keeps them fresh for up to 2 months.
Reheating
Reheat waffles in a toaster or oven at 350°F (175°C) for 5-7 minutes to restore their crispy exterior and fluffy inside. Avoid microwaving to prevent sogginess.
FAQs
Can I make Red Velvet Marbled Waffles without food coloring?
Yes, you can omit the red food coloring, but the waffles will lack the characteristic vibrant red appearance typical of red velvet; the flavor will remain delicious.
What can I use instead of buttermilk?
If you don’t have buttermilk, mix one tablespoon of white vinegar or lemon juice into one cup of milk and let it sit for 5 minutes before using as a substitute.
Can I use a store-bought waffle mix for this recipe?
This recipe works best made from scratch to get the authentic red velvet flavor and marble effect; store-bought mixes generally don’t have the cocoa or coloring needed.
How do I get the marble pattern perfect every time?
Divide your batter into two bowls, and gently swirl them together right on the waffle iron before cooking to maintain distinct red and white swirls without blending too much.
Are Red Velvet Marbled Waffles suitable for kids?
Absolutely! Kids love the bright colors and sweet flavors. Just adjust toppings and food coloring amounts if you prefer to keep it mild.
Final Thoughts
Red Velvet Marbled Waffles offer a delightful twist on classic waffles that’s rich in flavor, beautiful to serve, and downright fun to make. Whether you’re celebrating a special occasion or just want to treat yourself, this recipe is a guaranteed crowd-pleaser. So fire up your waffle iron and bring a splash of color and indulgence to your breakfast table—you won’t be disappointed!
Related Posts
PrintRed Velvet Marbled Waffles

Red Velvet Marbled Waffles combine the rich, velvety flavor of classic red velvet cake with the light, crispy texture of homemade waffles. Featuring vibrant red and creamy white swirls, these waffles offer a perfect balance of sweetness and fluffiness, ideal for a memorable breakfast or brunch treat.
- Prep Time: 15 minutes
- Cook Time: 15 minutes
- Total Time: 30 minutes
- Yield: 6-8 waffles 1x
- Category: Breakfast
- Method: Waffle Iron Cooking
- Cuisine: American
- Diet: Gluten Free (if using gluten-free flour)
Ingredients
Dry Ingredients
- 1 3/4 cups all-purpose flour (or gluten-free flour blend)
- 1/4 cup cocoa powder
- 1/4 cup granulated sugar
- 1 teaspoon baking powder
- 1/2 teaspoon baking soda
- Pinch of salt
Wet Ingredients
- 1 1/4 cups buttermilk (or plant-based milk with 1 tbsp vinegar/lemon juice)
- 2 large eggs (or flax eggs for vegan version)
- 1/4 cup vegetable oil
- 1 teaspoon vanilla extract
- 1 tablespoon red food coloring (optional)
For Marble Swirl
- 2–3 tablespoons cream cheese (softened; optional for swirling)
For Serving
- Cream cheese glaze or frosting
- Fresh berries (strawberries, raspberries)
- Whipped cream
- Powdered sugar (optional)
- Chopped nuts (optional)
Instructions
- Prepare the Batter: In a large bowl, whisk together the dry ingredients: flour, cocoa powder, sugar, baking powder, baking soda, and salt. In a separate bowl, combine the wet ingredients: buttermilk, eggs, vegetable oil, vanilla extract, and red food coloring. Gradually mix the wet ingredients into the dry ingredients until just combined, being careful not to overmix to keep the waffles tender.
- Create the Marble Effect: Divide the batter into two portions. Leave one portion plain, and add softened cream cheese or a lighter batter to the other portion to create contrast. When cooking, place spoonfuls of each batter on the waffle iron and gently swirl with a knife or spoon to form the marbled pattern without overmixing.
- Cook the Waffles: Preheat your waffle iron and lightly grease it. Pour the marbled batter evenly onto the iron, spreading carefully but preserving the swirl. Close the lid and cook according to your waffle maker’s instructions, usually 3-5 minutes, until the waffles are crisp and cooked through.
- Serve Warm and Enjoy: Carefully remove the waffles and serve immediately with toppings such as cream cheese glaze, fresh berries, whipped cream, or powdered sugar for a delicious brunch experience.
Notes
- Preheat your waffle iron thoroughly to ensure a crispy exterior.
- Mix the batter just until combined; overmixing results in dense waffles.
- Use room temperature ingredients for a smooth batter and to prevent lumps.
- Adjust cooking times based on your waffle iron to avoid undercooked waffles.
- Swirl batters gently to preserve the bright red and white marble effect.
- For vegan waffles, replace eggs with flax eggs and use plant-based milk.
- For gluten-free waffles, substitute the flour with a gluten-free blend.
- Add mix-ins like mini chocolate chips, cinnamon, or berry purees for variety.
- Store leftovers in an airtight container refrigerated up to 3 days, separating layers with parchment paper.
- Freeze cooled waffles individually before bagging for up to 2 months.
- Reheat waffles in a toaster or oven at 350°F (175°C) for 5-7 minutes to retain crispiness; avoid microwaving.
Nutrition
- Serving Size: 1 waffle
- Calories: 250
- Sugar: 10g
- Sodium: 250mg
- Fat: 12g
- Saturated Fat: 2.5g
- Unsaturated Fat: 8g
- Trans Fat: 0g
- Carbohydrates: 30g
- Fiber: 2g
- Protein: 5g
- Cholesterol: 50mg
Keywords: red velvet waffles, marbled waffles, brunch recipe, breakfast waffles, gluten-free waffles, velvet cake waffles