Easy Pear Preserves Recipe to Try Today

If you’ve ever wanted to try something delightfully sweet, fresh, and homemade, this Pear Preserves Recipe is exactly what you need. It’s a simple, approachable recipe perfect for beginners who want to capture the natural flavor of ripe pears in a jar. This easy Pear Preserves Recipe brings out the tender texture and delicate sweetness of pears, making it a versatile treat that can brighten up your breakfasts, snacks, or even desserts. Let’s dive in and get your kitchen smelling like cozy autumn days with this delicious, homemade preserve.
Why You’ll Love This Recipe
- Effortlessly Delicious: Minimal ingredients and straightforward steps make this Pear Preserves Recipe accessible for anyone.
- Natural Sweetness: Using fresh pears allows the recipe to harness their natural sugars, cutting down the need for extra sweeteners.
- Long-lasting Freshness: Proper preserving techniques ensure you enjoy pear goodness weeks or months after making it.
- Versatile Uses: Enjoy it spread on toast, swirled into yogurt, or used as a glaze with meats.
- Beginner Friendly: No advanced canning equipment required, making it perfect for first-timers.
Ingredients You’ll Need
There’s beauty in simplicity with this Pear Preserves Recipe. Each ingredient plays a crucial role in balancing flavor, texture, and shelf life without complicating the process.
- Fresh Pears: Choose ripe but firm pears for the best texture and natural sweetness.
- Sugar: Helps preserve the fruit while enhancing flavor and creating that irresistible syrupy consistency.
- Lemon Juice: Adds brightness and helps maintain the preserves’ color and freshness.
- Water: Balances the consistency and helps dissolve the sugar for an even, smooth texture.
- Vanilla Extract (optional): Adds a warm, aromatic depth to the preserves if desired.
Variations for Pear Preserves Recipe
Customize this Pear Preserves Recipe to your taste, dietary needs, or the ingredients available in your pantry with these easy adaptations. The best part is how flexible this recipe is without losing its charm.
- Spiced Pear Preserves: Add cinnamon sticks or star anise during cooking for a cozy, warm spice note.
- Ginger Infusion: Fresh grated ginger can add a gentle kick to brighten the sweetness.
- Low-Sugar Version: Reduce the sugar amount and boost natural sweetness with mashed ripe pears or a splash of apple juice.
- Herb-Infused: Fresh thyme or rosemary sprigs work wonderfully for a herbal twist.
- Mixed Fruit Preserves: Add chopped apples or quince for added texture and complexity.

How to Make Pear Preserves Recipe
Step 1: Prepare Your Pears
Begin by peeling, coring, and chopping your pears into small, even pieces. This ensures they cook evenly and break down gently to create that signature preserve texture.
Step 2: Combine Ingredients
In a large pot, add your chopped pears, sugar, lemon juice, and water. Stir everything gently to combine, making sure the sugar disperses well before heating.
Step 3: Simmer the Mixture
Bring your mixture to a gentle boil over medium heat, then reduce to a simmer. Stir frequently to prevent sticking and cook until the pears become tender and the liquid thickens into a syrupy consistency. This usually takes about 30-40 minutes.
Step 4: Add Flavor Enhancers
If you are using vanilla extract or spices like cinnamon, add them in the last 10 minutes of cooking to infuse their flavor without overpowering the pears.
Step 5: Jar the Preserves
Once your preserves reach the desired thickness, remove from heat and carefully ladle into sterilized jars. Seal while still hot for best preservation, and allow them to cool completely before storing.
Pro Tips for Making Pear Preserves Recipe
- Use Firm Pears: This helps maintain some texture and prevents the preserves from turning into complete mush.
- Stir Often: Prevents burning or sticking at the bottom of the pot during simmering.
- Adjust Thickness: Cook longer for thicker preserves, but keep an eye to avoid caramelizing sugar.
- Sterilize Jars Properly: Ensures your preserves stay fresh longer without spoilage.
- Taste Test: Sample during cooking to fine-tune sweetness or add spices as needed.
How to Serve Pear Preserves Recipe
Garnishes
Top your preserves with a sprinkle of crushed nuts like walnuts or pecans to add contrast and a nutty finish.
Side Dishes
Serve alongside warm biscuits, cheese plates, or as a topping for pancakes and waffles for a delightful sweet note.
Creative Ways to Present
Use the preserves as a layer in parfaits, swirl into oatmeal, or even as a glaze on roasted pork or chicken for a sweet-savory highlight.
Make Ahead and Storage
Storing Leftovers
After opening, keep your pear preserves refrigerated in an airtight container for up to two weeks to maintain freshness.
Freezing
Pear preserves freeze beautifully; just transfer them to a freezer-safe container and thaw overnight before use to enjoy anytime.
Reheating
Warm the preserves gently on the stove or in the microwave to bring back that fresh, just-made flavor before serving.
FAQs
Can I use canned pears instead of fresh ones?
While fresh pears provide the best texture and flavor, canned pears can work in a pinch but may result in softer preserves and slightly different taste.
How long do these preserves last unopened?
If sealed properly in sterilized jars, they can last up to a year stored in a cool, dark place.
Is it okay to reduce the sugar for a healthier version?
Yes, but keep in mind sugar acts as a preservative, so reducing it may shorten shelf life and affect the syrup’s thickness.
Can I use this recipe for other fruits?
Absolutely, similar small-batch preserves can be made with apples, peaches, or plums by adjusting cooking times for fruit texture.
Do I need special equipment for canning?
For this recipe, no special canning tools are necessary, but sterilizing jars and lids properly is crucial for safe storage.
Final Thoughts
This easy Pear Preserves Recipe is a wonderful way to bring fresh, homemade goodness into your kitchen. Its simplicity, natural sweetness, and versatility make it a staple you’ll want to return to again and again. Whether you’re gifting jars to friends or simply treating yourself, you’re just a few steps away from delicious pear preserves bursting with flavor. Go ahead and give it a try today—your taste buds will thank you!
Related Posts
- Why Molten Chocolate Crackle Pie Steals Hearts
- Why Vanilla Chai Pumpkin Latte Cupcakes with Cinnamon Brown Sugar Frosting Delight
- How to Make Milk Chocolate Stuffed Jack-O’-Lantern Cookies
Pear Preserves Recipe
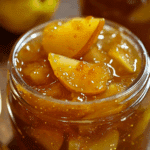
This Pear Preserves Recipe is a simple, beginner-friendly method to make delicious homemade preserves that capture the natural sweetness and tender texture of ripe pears. With minimal ingredients and straightforward steps, it ensures long-lasting freshness and versatile uses—from spreading on toast to glazing meats—offering a cozy autumnal flavor in every jar.
- Prep Time: 15 minutes
- Cook Time: 35 minutes
- Total Time: 50 minutes
- Yield: About 4 (8 oz) jars 1x
- Category: Condiments
- Method: Simmering
- Cuisine: American
- Diet: Gluten Free
Ingredients
Main Ingredients
- 4 cups fresh ripe but firm pears, peeled, cored, and chopped
- 2 cups granulated sugar
- 2 tablespoons lemon juice
- 1 cup water
- 1 teaspoon vanilla extract (optional)
Optional Variations
- 1–2 cinnamon sticks or 2 star anise pods (for spiced pear preserves)
- 1 tablespoon fresh grated ginger (for ginger infusion)
- Additional mashed ripe pears or 1/4 cup apple juice (for low-sugar version)
- 1–2 sprigs fresh thyme or rosemary (for herb infusion)
- 1 cup chopped apples or quince (for mixed fruit preserves)
Instructions
- Prepare Your Pears: Peel, core, and chop the pears into small, even pieces to ensure even cooking and a tender preserve texture.
- Combine Ingredients: In a large pot, add the chopped pears, sugar, lemon juice, and water. Stir gently to combine and dissolve the sugar before heating.
- Simmer the Mixture: Bring the mixture to a gentle boil over medium heat, then reduce to a simmer. Stir frequently to prevent sticking, cooking until pears are tender and the liquid thickens into a syrupy consistency, about 30-40 minutes.
- Add Flavor Enhancers: In the last 10 minutes of cooking, add vanilla extract or optional spices like cinnamon sticks or star anise to infuse their flavors without overpowering the pears.
- Jar the Preserves: Once the preserves reach the desired thickness, remove from heat and carefully ladle into sterilized jars. Seal while hot and allow to cool completely before storing.
Notes
- Use firm pears to maintain texture and avoid mushy preserves.
- Stir often during simmering to prevent burning or sticking to the pot.
- Cook longer if thicker preserves are desired but watch carefully to avoid caramelizing the sugar.
- Properly sterilize jars and lids to ensure safe preservation and freshness.
- Taste the preserves during cooking to adjust sweetness or spice levels as needed.
Nutrition
- Serving Size: 2 tablespoons
- Calories: 70
- Sugar: 17g
- Sodium: 0mg
- Fat: 0g
- Saturated Fat: 0g
- Unsaturated Fat: 0g
- Trans Fat: 0g
- Carbohydrates: 18g
- Fiber: 1g
- Protein: 0g
- Cholesterol: 0mg
Keywords: pear preserves, homemade preserves, pear jam, fruit preserves, easy preserves recipe, beginner preserves