Easy Homemade Pita Bread Recipe to Try Now
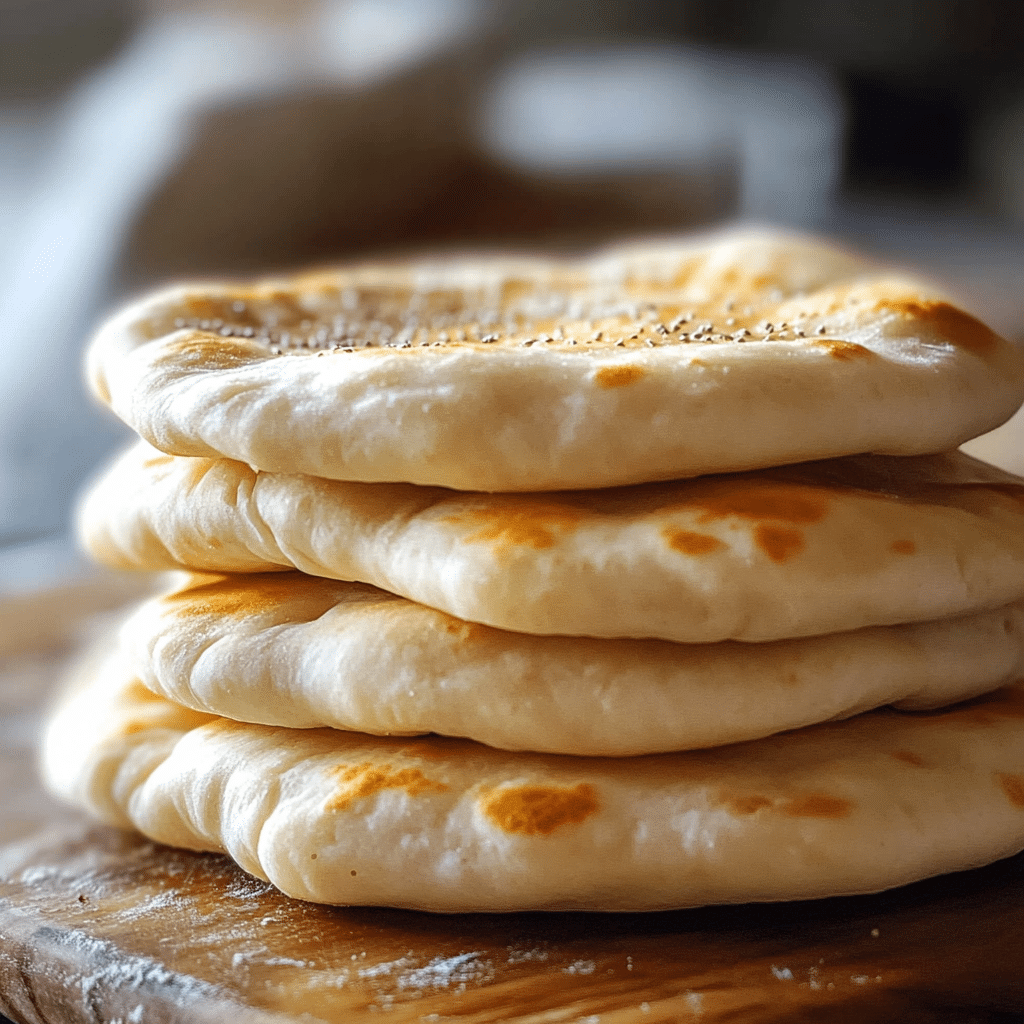
Craving soft, fluffy, and perfectly pocketed Homemade Pita Bread that you can whip up quickly in your own kitchen? This easy Homemade Pita Bread recipe is just what you need to elevate your sandwiches, dips, and snacks to a whole new level. With simple ingredients and straightforward steps, you’ll be enjoying warm, fresh pita bread in no time—perfect for impressing friends or treating yourself to a comforting homemade staple.
Why You’ll Love This Recipe
- Quick and Simple: Minimal ingredients and easy steps make this Homemade Pita Bread beginner-friendly and fast.
- Soft and Puffy Texture: The perfect balance of chewiness and fluffiness creates authentic pita pockets every time.
- Versatile Use: Ideal for wraps, dipping, or stuffing, making it a kitchen staple for many dishes.
- Customizable Flavor: You can easily tweak this recipe to suit your taste or dietary preferences.
- Cost-Effective: Homemade pita bread saves money compared to store-bought and tastes far better.
Ingredients You’ll Need
The simplicity of this Homemade Pita Bread recipe comes from a handful of essential pantry staples. Each ingredient plays a crucial role in achieving the perfect flavor, soft crumb, and beautiful golden color.
- All-purpose flour: Provides the base structure and softness for the bread.
- Active dry yeast: Helps the dough rise and creates those signature pita pockets.
- Warm water: Activates the yeast and hydrates the flour for a tender texture.
- Olive oil: Adds moisture and a subtle richness to the dough.
- Sugar: Feeds the yeast and encourages browning on the crust.
- Salt: Balances flavors and strengthens the dough.
Variations for Homemade Pita Bread
This Homemade Pita Bread recipe is wonderfully flexible. Don’t hesitate to experiment and make it your own, whether you need gluten-free options or want to add more flavor complexity.
- Whole Wheat Pita: Substitute half or all the flour with whole wheat for a nuttier taste and denser texture.
- Garlic and Herb: Mix minced garlic and fresh herbs into the dough for an aromatic twist.
- Gluten-Free Version: Use a gluten-free flour blend designed for bread-making, adjusting water as needed.
- Spiced Pita: Add spices like cumin, za’atar, or smoked paprika to enhance flavor depth.
- Seed Topping: Sprinkle sesame or nigella seeds on top before baking for extra crunch and visual flair.

How to Make Homemade Pita Bread
Step 1: Activate the Yeast
Combine warm water and sugar in a bowl, then sprinkle the active dry yeast over the surface. Let it sit for about 5-10 minutes until foamy, signaling that the yeast is active and ready to work its magic.
Step 2: Prepare the Dough
In a large mixing bowl, combine flour and salt. Add the olive oil and the activated yeast mixture. Stir until a shaggy dough forms, then knead on a floured surface for 8-10 minutes until smooth and elastic. The dough should bounce back when poked gently.
Step 3: Let the Dough Rise
Place the dough in a lightly oiled bowl, cover it with a clean towel or plastic wrap, and leave it to rise in a warm spot for about 1 to 1.5 hours, or until it doubles in size.
Step 4: Shape the Pitas
Once risen, punch down the dough and divide it into equal portions (typically 6-8). Roll each portion into a ball, then flatten into discs about 1/4 inch thick. Cover the discs lightly to prevent drying.
Step 5: Cook the Pita Breads
Preheat a heavy skillet or cast iron pan over medium-high heat. Place a disc in the pan for 1-2 minutes until bubbles form, then flip and cook the other side. The ideal result is a puffed-up pocket forming as it cooks. Repeat for each pita.
Step 6: Cool and Store
Transfer the cooked pitas to a clean kitchen towel to keep warm and soft. Serve immediately or allow to cool completely before storing in an airtight container.
Pro Tips for Making Homemade Pita Bread
- Water Temperature Matters: Use warm water between 100°F-110°F to activate yeast without killing it.
- Don’t Skip Kneading: Proper kneading develops gluten for that soft, chewy texture and nice pockets.
- Rest the Dough: Giving dough enough rise time ensures the pitas puff perfectly during cooking.
- Preheat Your Pan: Cooking on a hot surface quickly steams the dough, creating those signature pockets.
- Use a Kitchen Towel: Cover pitas post-cooking to hold moisture and keep them soft.
How to Serve Homemade Pita Bread
Garnishes
Sprinkle freshly chopped herbs like parsley or cilantro on your pita or brush with garlic butter right after cooking for an irresistible aroma and flavor boost.
Side Dishes
Homemade Pita Bread pairs incredibly well with classic Mediterranean sides like hummus, baba ganoush, tzatziki, or a fresh Greek salad.
Creative Ways to Present
Slice pitas to use as dippers for soups or turn them into mini pita pizzas topped with veggies and cheese for a fun twist everyone will love.
Make Ahead and Storage
Storing Leftovers
Keep leftover pitas in an airtight plastic bag or container at room temperature for up to 2 days to retain softness and freshness.
Freezing
To extend shelf life, freeze pitas separated by parchment paper in a sealed freezer bag for up to 3 months. Thaw at room temperature or heat directly from frozen.
Reheating
Rewarm pitas in a warm skillet for a minute or two, or wrap them in foil and heat in the oven to revive their softness and pliability.
FAQs
Can I use whole wheat flour for Homemade Pita Bread?
Yes, you can substitute all-purpose flour with whole wheat flour, either partially or fully, but expect a denser texture and slightly nuttier flavor.
Why didn’t my pita bread puff up?
Pita may not puff if the dough is too thick, the pan isn’t hot enough, or the dough did not rise adequately before cooking.
Can I make pita bread without yeast?
While traditional pita relies on yeast for puffing and texture, unleavened versions exist but won’t have the same pocketed softness.
How long does Homemade Pita Bread stay fresh?
When stored properly in an airtight container at room temperature, fresh pita bread stays soft for about 2 days.
Is Homemade Pita Bread suitable for sandwiches?
Absolutely! The pockets make it perfect for stuffing with your favorite fillings, from falafel to grilled veggies and meats.
Final Thoughts
Diving into Homemade Pita Bread is like welcoming a little bakery magic into your kitchen. With its soft texture, easy steps, and endless versatility, this recipe is sure to become a cherished favorite. Roll up your sleeves, gather your basics, and enjoy the wonderful experience of making fresh pita bread from scratch—you won’t look back!
Related Posts
- How to Make Spicy Potato Noodles in Chili Oil
- Easy Honey Sriracha Salmon Rice Bowls Recipe
- How to Make Bang Bang Salmon with Chili Sauce
Homemade Pita Bread
This easy Homemade Pita Bread recipe yields soft, fluffy, and perfectly pocketed pitas that are quick to make with simple pantry ingredients. Perfect for wraps, dips, and snacks, this versatile bread elevates meals with authentic texture and flavor, while being customizable to suit dietary preferences.
- Prep Time: 10 minutes
- Cook Time: 12 minutes
- Total Time: 1 hour 30 minutes
- Yield: 6-8 pita breads 1x
- Category: Appetizers
- Method: Stovetop Cooking
- Cuisine: Mediterranean
- Diet: Vegetarian
Ingredients
Basic Ingredients
- 2 cups all-purpose flour
- 1 tsp active dry yeast
- 3/4 cup warm water (100°F-110°F)
- 1 tbsp olive oil
- 1 tsp sugar
- 1/2 tsp salt
Instructions
- Activate the Yeast: Combine warm water and sugar in a bowl, then sprinkle the active dry yeast over the surface. Let it sit for 5-10 minutes until foamy, indicating the yeast is active and ready.
- Prepare the Dough: In a large mixing bowl, combine flour and salt. Add the olive oil and the activated yeast mixture. Stir until a shaggy dough forms, then knead on a floured surface for 8-10 minutes until smooth and elastic, with the dough bouncing back when poked gently.
- Let the Dough Rise: Place the dough in a lightly oiled bowl, cover it with a clean towel or plastic wrap, and leave it to rise in a warm spot for 1 to 1.5 hours, or until it doubles in size.
- Shape the Pitas: Punch down the dough and divide it into 6-8 equal portions. Roll each portion into a ball, then flatten into discs about 1/4 inch thick. Cover loosely to prevent drying.
- Cook the Pita Breads: Preheat a heavy skillet or cast iron pan over medium-high heat. Place one disc in the pan for 1-2 minutes until bubbles form, then flip and cook the other side, allowing a puffed pocket to form. Repeat for each pita.
- Cool and Store: Transfer cooked pitas to a clean kitchen towel to keep warm and soft. Serve immediately or cool completely before storing in an airtight container.
Notes
- Use warm water between 100°F-110°F to activate yeast without killing it.
- Proper kneading develops gluten for soft, chewy texture and perfect pockets.
- Allow enough rise time for pitas to puff properly during cooking.
- Preheat the pan well to steam the dough and create pockets.
- Cover pitas with a kitchen towel after cooking to retain moisture and softness.
Nutrition
- Serving Size: 1 pita
- Calories: 150 kcal
- Sugar: 1 g
- Sodium: 240 mg
- Fat: 3 g
- Saturated Fat: 0.5 g
- Unsaturated Fat: 2.5 g
- Trans Fat: 0 g
- Carbohydrates: 28 g
- Fiber: 1 g
- Protein: 5 g
- Cholesterol: 0 mg
Keywords: pita bread, homemade pita, flatbread, Mediterranean bread, pocket bread, quick bread, easy bread