How to Make Homemade Choco Tacos Easily
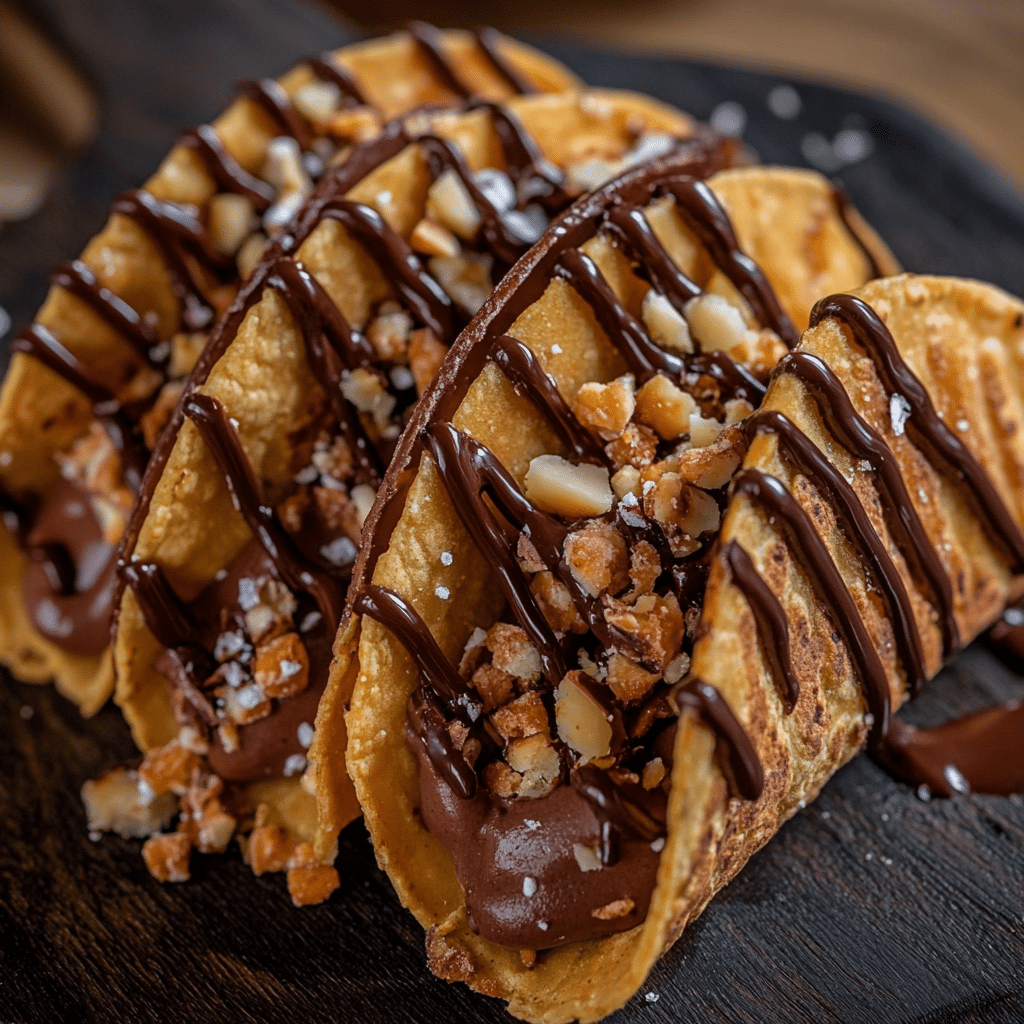
If you have a sweet tooth and love indulging in fun, nostalgic treats, learning how to make Homemade Choco Tacos easily is a game changer. This delicious recipe brings the magic of crunchy taco shells filled with creamy ice cream and coated in rich chocolate right to your kitchen. Perfect for a quick dessert or to impress guests, these choco tacos combine crispy texture and decadent flavors in a way that’s both delightful and surprisingly simple to whip up.
Why You’ll Love This Recipe
- Quick and Fun: Ready in under 30 minutes, it’s a perfect dessert for busy days or last-minute cravings.
- Kid-Friendly: A sweet treat that kids love making and eating without any complicated steps.
- Customizable: Easily adjusted with different fillings, toppings, or chocolate types to suit your taste.
- Texture Combo: Crispy taco shells paired with creamy ice cream and smooth chocolate sauce create an irresistible bite.
- Homemade Goodness: Free from preservatives and artificial flavors, it’s a wholesome alternative to store-bought snacks.
Ingredients You’ll Need
Gathering basic but essential ingredients is the first step to mastering Homemade Choco Tacos. Each component plays a key role in bringing the perfect mix of crunch, creaminess, and sweetness that makes this dessert special.
- Taco Shells: Store-bought crunchy tortillas work great or you can quickly shape your own for extra freshness.
- Vanilla Ice Cream: The creamy filling that balances the crispy shell, though any flavor can be used for variety.
- Chocolate Chips or Bars: Melted for coating the tacos, choose milk, dark, or semi-sweet depending on your preference.
- Peanuts or Sprinkles: Optional toppings that add crunch or color to the chocolate coating.
- Butter: Helps soften the taco shells slightly so they bend without breaking when shaped.
- Sugar: A small amount to enhance sweetness, especially when making homemade shells.
Variations for Homemade Choco Tacos
This recipe is so easy and flexible that you can play around with the fillings, toppings, or shells to suit dietary needs and flavor preferences. Don’t be afraid to get creative and make it your own signature treat.
- Fruit Fillings: Add chopped strawberries or bananas inside for a fruity twist.
- Dairy-Free Version: Use coconut or almond milk ice cream and dairy-free chocolate to cater to lactose intolerance.
- Nut Butter Drizzle: Swap peanuts for a swirl of peanut or almond butter over the chocolate coating for richness.
- Spiced Shells: Add a pinch of cinnamon or chili powder to your shells for a warm and unexpected kick.
- Different Shell Types: Try waffle cones shaped as tacos for a waffle-inspired crunch.

How to Make Homemade Choco Tacos
Step 1: Prepare the Taco Shells
Start by gently warming the tortillas with a little melted butter to make them pliable. Carefully fold or shape them over a taco mold or the edge of a baking tray to form the taco shell shape. Let them cool completely to become crisp and hold their form.
Step 2: Scoop and Fill with Ice Cream
Once your taco shells are set, scoop your chosen ice cream and fill each shell generously but neatly, making sure not to overfill to avoid messiness.
Step 3: Melt the Chocolate
In a microwave-safe bowl or using a double boiler, melt your chocolate chips or bars until smooth and glossy. Stir frequently to prevent burning.
Step 4: Dip the Tacos in Chocolate
Hold each filled taco and gently dip one side into the melted chocolate, coating the filling and some of the shell. Quickly add toppings like chopped peanuts or sprinkles before the chocolate sets.
Step 5: Chill to Set
Place the choco tacos on a parchment-lined tray and refrigerate or freeze for 15–20 minutes to let the chocolate harden and the dessert firm up.
Pro Tips for Making Homemade Choco Tacos
- Shell Warmth: Don’t heat taco shells too long or they become brittle and crack while shaping.
- Chocolate Tempering: Stir chocolate continuously during melting for smoother consistency and better snap once set.
- Ice Cream Firmness: Use ice cream slightly softened for easy scooping but firm enough to avoid melting too quickly during assembly.
- Toppings Timing: Add nuts or sprinkles immediately after dipping in chocolate to ensure they stick well.
- Storage Prep: Line trays with parchment paper to prevent sticking and ease cleanup.
How to Serve Homemade Choco Tacos
Garnishes
Sprinkle powdered sugar, drizzle caramel or chocolate syrup, or add fresh berries on top for a pretty finish that adds an extra layer of flavor and visual appeal.
Side Dishes
Pair your choco tacos with a scoop of sorbet or fresh fruit salad for a refreshing contrast to the rich chocolate and ice cream.
Creative Ways to Present
Serve on a vibrant platter decorated with edible flowers or in individual dessert cups with layers of whipped cream and crushed nuts for a fancy touch.
Make Ahead and Storage
Storing Leftovers
Store leftover choco tacos tightly wrapped in plastic wrap or in an airtight container to prevent freezer burn and ice crystal formation.
Freezing
Wrap each taco individually and freeze them flat to maintain shape; consume within two weeks for the best texture and flavor.
Reheating
Remove from the freezer 10 minutes before serving to soften slightly, but avoid microwaving as it will melt the chocolate and ice cream too fast.
FAQs
Can I use homemade taco shells instead of store-bought?
Absolutely! Homemade shells bring a fresh, personalized touch and allow you to control flavor and texture, just remember to make them thin and crisp for the best taco effect.
What is the best chocolate to use for coating?
Milk chocolate offers the sweetest, most traditional taste, while dark chocolate adds richness; semi-sweet works well for balanced sweetness. Choose based on your preference.
How long can I store Homemade Choco Tacos in the freezer?
For optimal taste and texture, store them for up to two weeks wrapped well to avoid freezer odors and moisture.
Can I prepare these without an ice cream maker?
Yes, simply purchase your favorite pre-made ice cream or frozen yogurt for a no-fuss filling option that works just as well.
Are there dairy-free options available for this recipe?
Definitely! Using dairy-free ice cream and vegan chocolate alternatives lets you enjoy Homemade Choco Tacos completely dairy-free without sacrificing taste.
Final Thoughts
Making Homemade Choco Tacos easily in your own kitchen is such a rewarding way to enjoy a playful and delicious dessert that everyone will love. Whether it’s for a hot summer day, an exciting party treat, or just because you deserve something sweet, this recipe brings smiles and satisfaction with every bite. So grab your ingredients, get creative, and treat yourself and your loved ones to these irresistible choco tacos today!
PrintHomemade Choco Tacos

Enjoy the nostalgic delight of Homemade Choco Tacos — crunchy taco shells filled with creamy ice cream and coated in rich, melted chocolate. This quick and fun dessert is perfect for busy days or parties, combining crispy texture, smooth chocolate, and sweet, creamy ice cream to create an irresistible treat that’s easy to make and customizable to your taste.
- Prep Time: 15 minutes
- Cook Time: 10 minutes
- Total Time: 25 minutes
- Yield: 4 servings 1x
- Category: Desserts
- Method: Assembly and chilling
- Cuisine: American
- Diet: Gluten Free
Ingredients
Taco Shells
- 4 store-bought crunchy tortillas (or homemade shells)
- 2 tablespoons melted butter
- 1 teaspoon sugar (optional, for homemade shells)
Ice Cream Filling
- 1 quart vanilla ice cream (or any flavor of choice)
Chocolate Coating
- 1 cup chocolate chips or bars (milk, dark, or semi-sweet)
- Optional toppings: 1/4 cup chopped peanuts or sprinkles
Instructions
- Prepare the Taco Shells: Gently warm the tortillas with melted butter to make them pliable. Carefully fold or shape them over a taco mold or the edge of a baking tray to form the taco shell shape. Let them cool completely to become crisp and hold their form.
- Scoop and Fill with Ice Cream: Once your taco shells are set, scoop your chosen ice cream and fill each shell generously but neatly, making sure not to overfill to avoid messiness.
- Melt the Chocolate: In a microwave-safe bowl or using a double boiler, melt your chocolate chips or bars until smooth and glossy. Stir frequently to prevent burning.
- Dip the Tacos in Chocolate: Hold each filled taco and gently dip one side into the melted chocolate, coating the filling and some of the shell. Quickly add toppings like chopped peanuts or sprinkles before the chocolate sets.
- Chill to Set: Place the choco tacos on a parchment-lined tray and refrigerate or freeze for 15–20 minutes to let the chocolate harden and the dessert firm up.
Notes
- Don’t heat taco shells too long or they become brittle and crack while shaping.
- Stir chocolate continuously during melting for smoother consistency and better snap once set.
- Use ice cream slightly softened for easy scooping but firm enough to avoid melting too quickly during assembly.
- Add nuts or sprinkles immediately after dipping in chocolate to ensure they stick well.
- Line trays with parchment paper to prevent sticking and ease cleanup.
Nutrition
- Serving Size: 1 choco taco
- Calories: 320
- Sugar: 25g
- Sodium: 120mg
- Fat: 18g
- Saturated Fat: 10g
- Unsaturated Fat: 6g
- Trans Fat: 0g
- Carbohydrates: 32g
- Fiber: 2g
- Protein: 5g
- Cholesterol: 40mg
Keywords: choco tacos, ice cream dessert, chocolate taco, homemade choco taco, easy dessert, kid-friendly dessert, nostalgic treat