Dreamy Corn Pudding
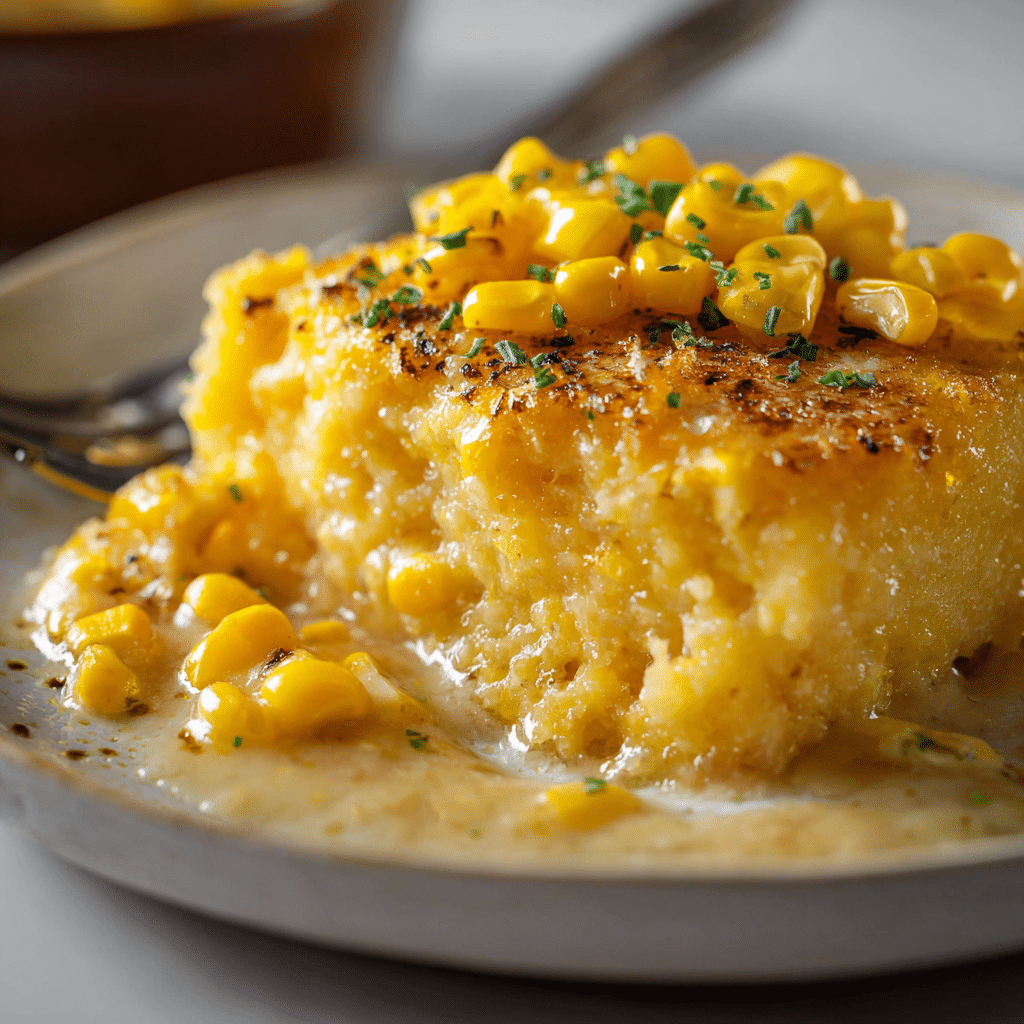
Dreamy Corn Pudding is the kind of creamy, sweet comfort dish that instantly warms hearts and brings smiles to the table. This luscious blend of tender corn, rich custard, and a subtle hint of sweetness makes every bite feel like a cozy hug. Whether you’re serving it as a side or savoring it as a comforting dessert, Dreamy Corn Pudding never fails to delight with its smooth texture and classic charm.
Why You’ll Love This Recipe
- Ultimate Comfort Food: This pudding delivers rich, velvety creaminess that soothes your soul with every spoonful.
- Simple Ingredients: Made with everyday pantry staples, it’s easy to whip up without any fuss or fancy tools.
- Versatile Serving Options: Enjoy it warm or chilled, as a side dish or a sweet treat, fitting any meal perfectly.
- Family Favorite: Its familiar, mild sweetness appeals to both kids and adults alike, making it a crowd-pleaser.
- Quick Comfort: Ready in under an hour, you can satisfy your craving for something hearty and homemade fast.
Ingredients You’ll Need
The beauty of Dreamy Corn Pudding lies in using simple, wholesome ingredients that blend effortlessly to create that signature creamy and sweet flavor. Each element plays a vital role, from the corn’s natural sweetness to the custard’s silky texture and even the touch of spice that adds depth.
- Corn Kernels: Fresh, canned, or frozen corn brings sweetness and texture to the pudding.
- Milk or Cream: Provides a rich, creamy base essential for the custard’s smoothness.
- Eggs: Act as a binder to hold everything together and give the pudding structure.
- Sugar: Balances the natural savory notes with a gentle sweetness.
- Butter: Adds a luscious, buttery undertone and richness.
- Flour or Cornmeal: Helps thicken the pudding and adds body to the texture.
- Vanilla Extract: Enhances flavor complexity with warm, inviting aroma.
- Salt and Pepper: Just a pinch to balance the sweetness and highlight flavors.
Variations for Dreamy Corn Pudding
One of the best things about Dreamy Corn Pudding is how easy it is to tailor to your tastes or dietary needs. Whether you want to add a little extra flair or keep things simple and wholesome, these variations help you make the perfect version for your table.
- Cheesy Twist: Stir in shredded cheddar or mozzarella for a savory, gooey upgrade.
- Spicy Kick: Add diced jalapeños or a dash of cayenne pepper to awaken your palate.
- Dairy-Free Version: Swap in coconut milk or almond milk and use vegan butter for a plant-based delight.
- Herb Infusion: Fresh thyme or rosemary adds a subtle, aromatic herbal note.
- Sweetened with Honey: Replace sugar with honey for a natural, floral sweetness and deeper flavor.

How to Make Dreamy Corn Pudding
Step 1: Prepare the Corn
Start by draining canned corn or thawing frozen kernels, then lightly sauté them in butter to enhance their sweetness and aroma.
Step 2: Mix the Custard Base
In a mixing bowl, whisk together eggs, milk or cream, sugar, vanilla extract, and a pinch of salt until smooth and creamy.
Step 3: Combine Ingredients
Gently fold the sautéed corn into the custard mix, then stir in flour or cornmeal gradually to achieve the perfect thickening consistency.
Step 4: Bake the Pudding
Pour the mixture into a buttered baking dish and bake at 350°F (175°C) for 45-50 minutes, or until golden and set with a slight jiggle in the center.
Step 5: Cool and Serve
Allow the pudding to cool for 10-15 minutes to let it firm up slightly, making it easier to scoop and enhancing the flavors.
Pro Tips for Making Dreamy Corn Pudding
- Use Fresh Kernels: Fresh corn offers the best sweetness and texture compared to canned or frozen.
- Don’t Overbake: Keep an eye on the pudding towards the end to prevent drying out and maintain creaminess.
- Butter Both the Dish and the Top: This ensures easy serving and a beautifully golden crust.
- Whisk Eggs Thoroughly: This helps create a smooth custard and avoids any clumps in the pudding.
- Let It Rest: Cooling briefly before serving lets flavors develop fully and improves texture.
How to Serve Dreamy Corn Pudding
Garnishes
Brighten your corn pudding by topping it with chopped fresh herbs like parsley or chives for a pop of color and freshness, or sprinkle with a hint of smoked paprika for a subtle smoky aroma.
Side Dishes
Dreamy Corn Pudding pairs beautifully with roasted meats like chicken or pork, crispy fried green tomatoes, or a fresh salad to add lightness to your meal.
Creative Ways to Present
Try serving in individual ramekins for an elegant touch, or spoon it into small mason jars for a charming picnic option — either way, it’s sure to impress your guests.
Make Ahead and Storage
Storing Leftovers
Store leftover Dreamy Corn Pudding in an airtight container in the refrigerator for up to 3 days, ensuring each serving stays moist and flavorful.
Freezing
You can freeze the pudding in freezer-safe containers for up to 2 months; thaw overnight in the fridge before reheating gently.
Reheating
Warm individual portions in the microwave or reheat the whole dish in a low oven, covered loosely with foil to prevent drying out.
FAQs
Can I use canned corn for Dreamy Corn Pudding?
Absolutely, canned corn works well, especially when drained properly, but fresh corn provides the sweetest, most vibrant flavor.
Is Dreamy Corn Pudding gluten-free?
It depends on the flour used; to keep it gluten-free, substitute all-purpose flour with a gluten-free flour blend or use cornmeal.
Can I make this recipe vegan?
Yes, by swapping eggs for flaxseed or chia egg alternatives and using plant-based milk and vegan butter, you can enjoy a vegan version.
How sweet is Dreamy Corn Pudding?
It’s gently sweet, balancing the natural sweetness of corn without being overly sugary, making it suitable as both a side or dessert.
What’s the best way to reheat leftovers without drying them out?
Reheat covered in the oven at low temperature or in the microwave with a damp paper towel on top to retain moisture.
Final Thoughts
Dreamy Corn Pudding is truly a dish that brings joy with its rich, smooth texture and irresistible sweet charm. Whether for everyday meals or special occasions, it’s a recipe worth keeping in your kitchen rotation. So go ahead and give this creamy classic a try — your taste buds and loved ones will thank you!
Related Posts
PrintDreamy Corn Pudding

Dreamy Corn Pudding is a creamy, sweet comfort dish combining tender corn kernels with a rich custard base. This luscious blend features a smooth texture with subtle sweetness and a buttery undertone, perfect served warm or chilled. Ideal as a side dish or a comforting dessert, it’s easy to prepare using simple pantry staples and promises to be a family favorite with its mild sweetness and classic charm.
- Prep Time: 15 minutes
- Cook Time: 45-50 minutes
- Total Time: 1 hour
- Yield: 6 servings 1x
- Category: Appetizers
- Method: Baking
- Cuisine: American
- Diet: Gluten Free (if using cornmeal instead of flour)
Ingredients
Main Ingredients
- 2 cups corn kernels (fresh, canned and drained, or thawed frozen)
- 1 cup milk or cream
- 3 large eggs
- 1/3 cup sugar
- 2 tablespoons butter
- 1/4 cup all-purpose flour or cornmeal
- 1 teaspoon vanilla extract
- 1/4 teaspoon salt
- 1/8 teaspoon black pepper
Instructions
- Prepare the Corn: Drain canned corn or thaw frozen kernels. Lightly sauté the corn in butter over medium heat until fragrant and slightly caramelized to enhance sweetness and aroma.
- Mix the Custard Base: In a mixing bowl, whisk together eggs, milk or cream, sugar, vanilla extract, and salt until the mixture is smooth and creamy.
- Combine Ingredients: Gently fold the sautéed corn into the custard base. Gradually stir in the flour or cornmeal until the mixture thickens to the right consistency.
- Bake the Pudding: Pour the batter into a buttered baking dish. Bake at 350°F (175°C) for 45-50 minutes, or until the pudding is golden on top, set, and has a slight jiggle in the center.
- Cool and Serve: Let the pudding cool for 10-15 minutes to firm up slightly, making it easier to scoop and enhancing flavor before serving.
Notes
- Use fresh corn kernels for the best sweetness and texture.
- Do not overbake to avoid drying out; watch closely near the end of baking.
- Butter both the baking dish and the top of the pudding for easy serving and a golden crust.
- Whisk eggs thoroughly to create a smooth custard and prevent clumps.
- Allow the pudding to rest briefly after baking for fullest flavor and best texture.
Nutrition
- Serving Size: 1/6 of recipe
- Calories: 230 kcal
- Sugar: 10 g
- Sodium: 150 mg
- Fat: 10 g
- Saturated Fat: 6 g
- Unsaturated Fat: 3 g
- Trans Fat: 0 g
- Carbohydrates: 28 g
- Fiber: 2 g
- Protein: 6 g
- Cholesterol: 110 mg
Keywords: corn pudding, creamy corn custard, comfort food, side dish, dessert, gluten free corn pudding