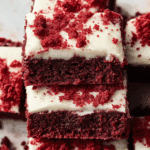
How to Make Red Velvet Brownies Perfectly

If you’re craving something decadent, rich, and uniquely colorful, Red Velvet Brownies are the dessert to try next. These luscious, fudgy brownies combine the smooth creaminess of classic chocolate with the tangy hint of buttermilk and the iconic red hue drawn from cocoa and red food coloring. With every bite, you’ll experience a perfect balance of moist texture and deep flavor that makes this dessert irresistibly good and impressively beautiful for any occasion.
Why You’ll Love This Recipe
- Rich and fudgy texture: These brownies boast a dense, moist bite that melts wonderfully in your mouth.
- Vibrant red color: The classic red velvet hue makes the brownies as stunning as they are delicious.
- Balanced flavor profile: Tangy buttermilk and mild cocoa create a unique and delightful taste.
- Easy to follow steps: Every stage is simple and approachable for bakers of all levels.
- Customizable with toppings: Perfect base to add cream cheese frosting, nuts, or chocolate chips as you like.
Ingredients You’ll Need
Each ingredient plays an essential role in creating the perfect Red Velvet Brownies, from the flavor depth brought by cocoa powder to the moistening power of buttermilk. Let’s take a look at the essentials for achieving the ideal blend of taste, texture, and eye-catching color.
- Unsweetened cocoa powder: Adds subtle chocolate flavor and richness without overpowering the velvet taste.
- All-purpose flour: Provides structure while keeping the brownies tender and soft.
- Granulated sugar: Sweetens the batter evenly for a balanced flavor.
- Butter, melted: Enhances moisture and adds a buttery richness that’s essential for fudgy brownies.
- Eggs: Bind everything together and give the brownies their classic fudgy texture.
- Buttermilk: Offers tanginess and acidity, boosting the depth of red velvet’s unique flavor.
- Vanilla extract: Adds warmth and rounds out the overall flavor.
- Red food coloring: Creates the signature bold red appearance.
- Baking powder: Provides gentle lift while maintaining density.
- Salt: Balances sweetness and enhances all other flavors.
Variations for Red Velvet Brownies
Red Velvet Brownies are incredibly versatile. Feel free to mix things up to better suit your taste buds or dietary needs — it’s easier than you’d think to customize this perfectly rich dessert.
- Cream cheese swirl: Adding a swirl of cream cheese mixture on top creates a moist, tangy contrast.
- Nut boost: Chopped pecans or walnuts add a desirable crunch without overshadowing the flavor.
- Chocolate chips: Fold in dark or white chocolate chips for bursts of gooey sweetness.
- Gluten-free adaptation: Swap all-purpose flour with a gluten-free blend and enjoy worry-free brownies.
- Vegan option: Replace butter with coconut oil and eggs with flax eggs for a plant-based treat.

How to Make Red Velvet Brownies
Step 1: Prepare your baking pan
Line an 8×8-inch baking pan with parchment paper or lightly grease it to prevent sticking and make it easier to lift the brownies after baking.
Step 2: Mix dry ingredients
In a medium bowl, sift together the all-purpose flour, unsweetened cocoa powder, baking powder, and salt. Set this dry mix aside while you combine the wet ingredients.
Step 3: Combine wet ingredients
In a large bowl, whisk the melted butter and sugar until smooth. Add eggs one at a time, mixing well after each addition. Stir in buttermilk, vanilla extract, and red food coloring until the batter is evenly colored and smooth.
Step 4: Incorporate dry ingredients
Gradually fold the dry ingredient mixture into the wet ingredients, stirring just until combined to avoid overmixing, which can lead to dense brownies.
Step 5: Bake
Pour the batter into the prepared pan and spread evenly. Bake in a preheated oven at 350°F (175°C) for 25 to 30 minutes, or until a toothpick inserted in the center comes out with a few moist crumbs attached.
Step 6: Cool and serve
Allow the brownies to cool completely in the pan on a wire rack before slicing for clean edges and perfect texture.
Pro Tips for Making Red Velvet Brownies
- Use good quality cocoa powder: A richer cocoa will deepen the flavor and improve the overall brownies’ taste.
- Don’t skip sifting: Sifting the dry ingredients helps prevent lumps and ensures an even texture.
- Watch your baking time: Overbaking can dry out the brownies, so start checking a few minutes early.
- Room temperature ingredients: Eggs and buttermilk should be at room temperature for better mixing.
- Cut after cooling: Slicing brownies when warm can cause crumbling; patience pays off.
How to Serve Red Velvet Brownies
Garnishes
Top with a dusting of powdered sugar, a drizzle of melted white chocolate, or a swirl of cream cheese frosting to elevate presentation and enhance taste.
Side Dishes
Pair Red Velvet Brownies with a scoop of vanilla ice cream or fresh berries to complement the richness and add refreshing contrast.
Creative Ways to Present
Try cutting brownies into bite-sized squares for parties or layering them in a dessert parfait with whipped cream and fruit for a stunning twist.
Make Ahead and Storage
Storing Leftovers
Store leftover Red Velvet Brownies in an airtight container at room temperature for up to 3 days to maintain freshness and softness.
Freezing
Wrap brownies tightly in plastic wrap, then foil, and freeze for up to 3 months. Thaw overnight in the fridge before serving.
Reheating
Warm brownies briefly in the microwave (10-15 seconds) for that fresh-out-of-the-oven softness without drying them out.
FAQs
Can I use regular milk instead of buttermilk?
Yes, you can substitute regular milk mixed with a tablespoon of lemon juice or vinegar as a quick buttermilk replacement to maintain the tang and texture.
What if I want less red dye?
You can reduce the red food coloring amount, but keep in mind it will affect the classic red velvet appearance; natural alternatives like beet juice can also work.
Can I make these gluten-free?
Absolutely! Using a 1-to-1 gluten-free baking flour blend works well without sacrificing texture or flavor.
How thick should the brownies be?
A thickness of about 1.5 inches in an 8×8 pan results in the perfect fudgy, chewy texture.
Do Red Velvet Brownies need frosting?
Frosting is optional; they are delicious on their own but adding cream cheese frosting or a dusting of powdered sugar can enhance richness and presentation.
Final Thoughts
Red Velvet Brownies bring together the best of two beloved desserts — the indulgent texture of brownies and the iconic flavor of red velvet cake. Once you make these, they will quickly become a go-to treat for celebrations or cozy nights in. Dive in with this easy, foolproof recipe and share the joy of baking something special with your friends and family.
Related Posts
- Why Brown Sugar Peach Cake is a Must-Try Dessert
- How to Make Marble Loaf Cake with Ganache
- Why Blueberry Crumble Cheesecake Steals Hearts
Red Velvet Brownies
Red Velvet Brownies are decadent, rich, and uniquely colorful desserts combining smooth chocolate creaminess with a tangy hint of buttermilk and a vibrant red hue. They offer a perfect balance of moist texture and deep flavor, making them irresistible and visually stunning for any occasion.
- Prep Time: 15 minutes
- Cook Time: 25-30 minutes
- Total Time: 40-45 minutes
- Yield: 16 brownies 1x
- Category: Dessert
- Method: Baking
- Cuisine: American
- Diet: Gluten Free
Ingredients
Dry Ingredients
- 1 cup all-purpose flour
- 1/4 cup unsweetened cocoa powder
- 1/2 teaspoon baking powder
- 1/4 teaspoon salt
Wet Ingredients
- 1/2 cup unsalted butter, melted
- 1 cup granulated sugar
- 2 large eggs
- 1/4 cup buttermilk, at room temperature
- 1 teaspoon vanilla extract
- 2 tablespoons red food coloring
Instructions
- Prepare your baking pan: Line an 8×8-inch baking pan with parchment paper or lightly grease it to prevent sticking and make it easier to lift the brownies after baking.
- Mix dry ingredients: In a medium bowl, sift together the all-purpose flour, unsweetened cocoa powder, baking powder, and salt. Set this dry mix aside while you combine the wet ingredients.
- Combine wet ingredients: In a large bowl, whisk the melted butter and sugar until smooth. Add eggs one at a time, mixing well after each addition. Stir in buttermilk, vanilla extract, and red food coloring until the batter is evenly colored and smooth.
- Incorporate dry ingredients: Gradually fold the dry ingredient mixture into the wet ingredients, stirring just until combined to avoid overmixing, which can lead to dense brownies.
- Bake: Pour the batter into the prepared pan and spread evenly. Bake in a preheated oven at 350°F (175°C) for 25 to 30 minutes, or until a toothpick inserted in the center comes out with a few moist crumbs attached.
- Cool and serve: Allow the brownies to cool completely in the pan on a wire rack before slicing for clean edges and perfect texture.
Notes
- Use good quality cocoa powder for deeper flavor.
- Always sift dry ingredients to prevent lumps and ensure even texture.
- Watch your baking time carefully to avoid drying out the brownies.
- Use room temperature eggs and buttermilk for better mixing.
- Slice brownies only after they have fully cooled to prevent crumbling.
Nutrition
- Serving Size: 1 brownie (approx. 2x2 inch)
- Calories: 210
- Sugar: 18g
- Sodium: 120mg
- Fat: 12g
- Saturated Fat: 7g
- Unsaturated Fat: 4g
- Trans Fat: 0g
- Carbohydrates: 26g
- Fiber: 1g
- Protein: 3g
- Cholesterol: 55mg
Keywords: Red Velvet Brownies, fudgy brownies, red velvet dessert, easy brownies, gluten free brownies