5 Easy Pizza Paninis You’ll Love
If you’re a fan of melty cheese, crispy bread, and all the savory goodness of pizza, then you’re going to absolutely adore these 5 easy Pizza Paninis. These handheld delights combine the best of two worlds—pizza and panini sandwiches—into quick, scrumptious meals perfect for lunch, dinner, or a satisfying snack. Packed with gooey cheese and vibrant flavors, these pizza paninis are a breeze to whip up anytime you crave something cozy and delicious without spending hours in the kitchen.
Why You’ll Love This Recipe
- Quick and Simple: Perfect for busy days when you want a filling meal without complicated prep.
- Versatile Flavors: Endless possibilities to customize with your favorite pizza toppings and cheeses.
- Perfectly Crispy: The panini press creates a golden, crunchy crust that contrasts beautifully with gooey melted cheese.
- Kid-Approved: An easy way to sneak in veggies and satisfy picky eaters with classic pizza tastes.
- Great for Leftovers: A fantastic use for leftover pizza sauce, meats, or veggies to reduce kitchen waste.
Ingredients You’ll Need
Don’t worry about finding fancy ingredients for these pizza paninis—simple pantry staples and fresh items deliver fantastic flavor, texture, and color every time. Here’s what you’ll need to get started:
- Bread: Use ciabatta, focaccia, or sturdy sandwich bread for the best crunch and structure.
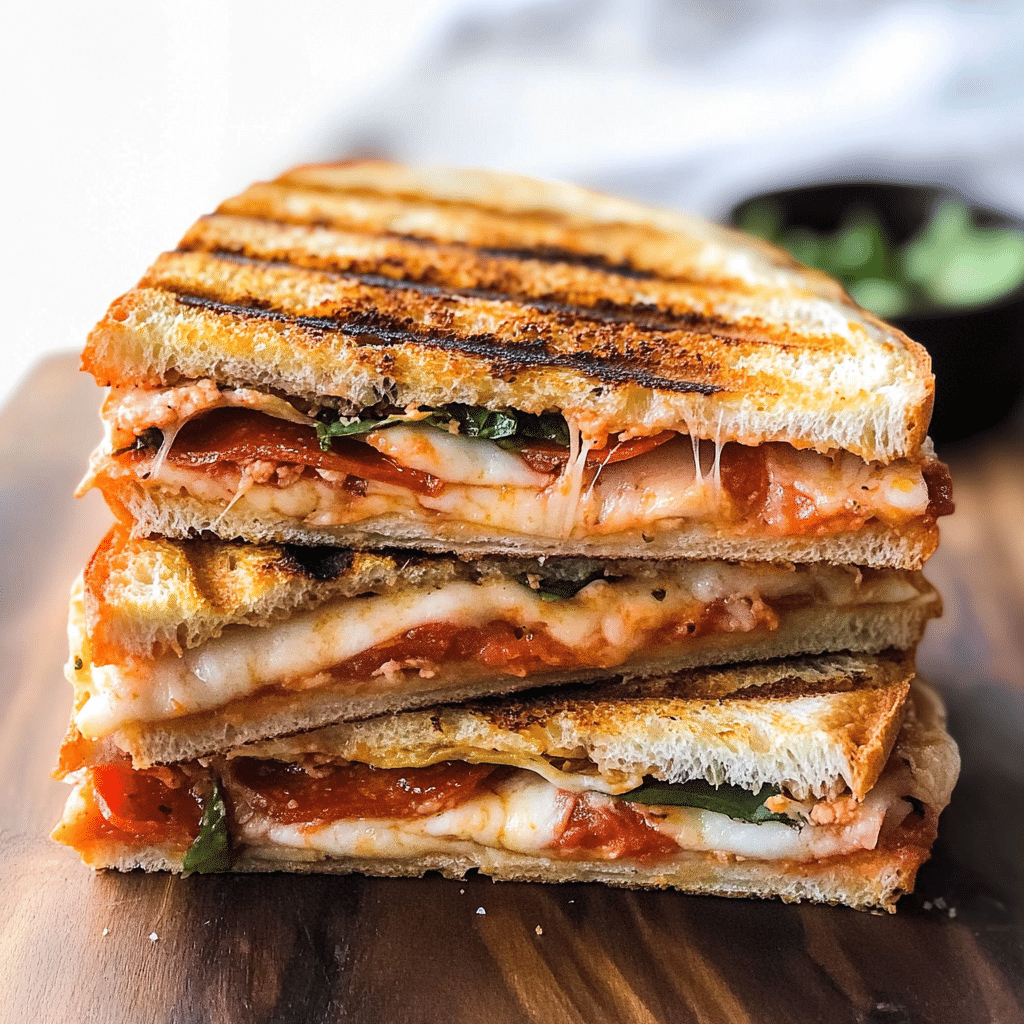
- Cheese: Mozzarella is a must for that perfect melt, but feel free to mix in provolone, parmesan, or cheddar.
- Pizza Sauce: A tangy tomato base that ties all the flavors together with classic pizza zest.
- Toppings: Pepperoni, mushrooms, bell peppers, or olives add texture and bursts of flavor.
- Olive Oil or Butter: For brushing on the outside to achieve a golden, crisp finish.
Variations for Pizza Paninis
Feel free to get creative with these pizza paninis! They’re incredibly easy to adapt based on what you have on hand or dietary needs, so you can always tailor them to your tastes.
- Vegetarian Delight: Load up with grilled zucchini, roasted red peppers, and fresh basil instead of meat.
- Spicy Kick: Add jalapeños, crushed red pepper flakes, and spicy sausage for a fiery twist.
- Gluten-Free: Substitute your bread for gluten-free varieties to keep it comfortable for gluten-sensitive friends.
- Vegan Version: Use dairy-free cheese and plenty of veggie toppings for a completely plant-based option.
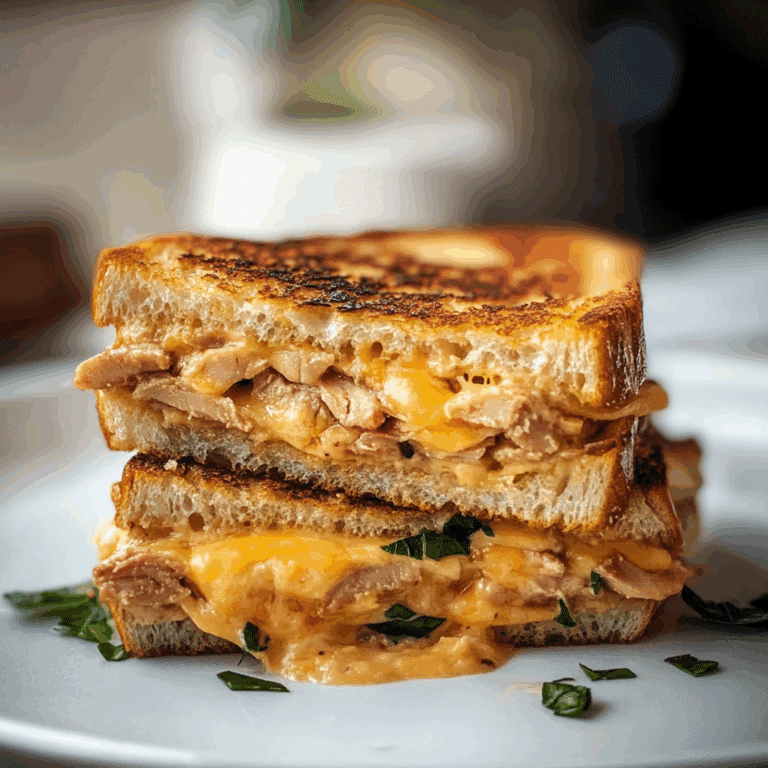
- Breakfast Panini: Incorporate eggs, bacon, and a sprinkle of cheddar for a morning spin on pizza paninis.

How to Make Pizza Paninis
Step 1: Prepare Your Bread
Start by selecting fresh, sturdy bread that will hold up well when pressed—ciabatta or focaccia works especially well. Slice it to your preferred thickness, usually about 1/2 to 3/4 inch, so it crisps nicely without getting soggy.
Step 2: Add the Sauce
Spread a generous layer of your favorite pizza sauce evenly over one side of the bread slices. This flavorful foundation ensures every bite delivers that classic pizza tang.
Step 3: Layer Your Cheese and Toppings
Next, pile on the mozzarella and any additional cheeses you love. Then add your chosen toppings—whether it’s savory meats, vegetables, or herbs—to create that perfect pizza filling.
Step 4: Assemble and Butter
Place the other slice of bread on top to form a sandwich. Lightly brush the outsides with olive oil or melted butter to help achieve that golden, crunchy panini crust.
Step 5: Grill Until Perfect
Place your assembled sandwich in a hot panini press or grill pan. Cook for about 3 to 5 minutes on each side until the bread is toasted crisp and the cheese has melted into ooey-gooey perfection.
Pro Tips for Making Pizza Paninis
- Use Cold Ingredients: Fresh toppings and cold cheese melt more evenly and help control your panini’s texture.
- Don’t Overload: Too many toppings can make your panini soggy or difficult to press properly.
- Preheat Your Press: A hot panini press guarantees that crisp, golden finish you want.
- Experiment with Bread: Try different types to find your favorite combo of chewiness and crunch.
- Double Press for Extra Crisp: After flipping, press the sandwich firmly again for an ultra-crisp crust.
How to Serve Pizza Paninis
Garnishes
Sprinkle fresh chopped basil or oregano over your cooked pizza paninis for a fragrant, restaurant-like touch. A light drizzle of balsamic glaze or a scatter of chili flakes can add a gourmet flair and elevate each bite.
Side Dishes
Pair your pizza paninis with a crisp green salad tossed in vinaigrette for balance, or serve alongside a cup of warm tomato soup to double down on comforting, classic flavors.
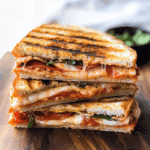
Creative Ways to Present
Slice your pizza paninis into smaller wedges and arrange them on a wooden board for sharing. Add dipping sauces such as garlic aioli, pesto, or extra pizza sauce on the side to create an interactive feast perfect for gatherings.
Make Ahead and Storage
Storing Leftovers
Wrap any leftover pizza paninis tightly in foil or airtight containers and refrigerate. They stay fresh for up to 2 days and can be quickly reheated without losing much of their crispness.
Freezing
For longer storage, freeze assembled but unpressed sandwiches by wrapping them individually. When ready to eat, thaw briefly and cook in a preheated panini press to revive their crispy, melty glory.
Reheating
Reheat pizza paninis in a toaster oven or panini press to keep the crust crunchy and the cheese perfectly melted—not soggy like a microwave reheat would produce.
FAQs
Can I use regular sandwich bread for pizza paninis?
Yes, regular sandwich bread works in a pinch, but sturdier bread like ciabatta or focaccia will give you better texture and hold up to fillings without becoming soggy.
What cheeses work best for pizza paninis?
Mozzarella is the classic choice for its meltability, but combining it with provolone, cheddar, or parmesan adds great depth and flavor.
How do I make my pizza paninis crispy on the outside?
Brushing the outside with olive oil or butter before grilling and ensuring your panini press is preheated are key steps to achieving a golden, crispy crust.
Can I make pizza paninis without a panini press?
Absolutely! Use a grill pan or heavy skillet and press down firmly with a spatula or another heavy pan, flipping carefully until both sides are toasted and cheese is melted.
Are pizza paninis suitable for meal prep?
Definitely. You can assemble them ahead and refrigerate or freeze, then grill when ready to eat for a quick, satisfying meal anytime.
Final Thoughts
There’s something incredibly comforting about biting into a warm, cheesy pizza panini that brings a little joy to your day. With these 5 easy pizza panini recipes, you can whip up delicious, satisfying meals in minutes—no complex steps or hard-to-find ingredients needed. So grab your bread, favorite toppings, and get ready to experience the perfect marriage of two beloved favorites. Trust me, once you try these pizza paninis, you’ll find they’re your new go-to for quick, flavorful meals!
PrintPizza Paninis
These Pizza Paninis combine the melty cheese and savory flavors of pizza with the crispy, handheld convenience of panini sandwiches. Perfect for quick lunches, dinners, or snacks, this recipe offers versatility with endless topping options and a golden, crunchy crust achieved using a panini press. Ideal for busy days and adaptable for vegetarian, vegan, gluten-free, and breakfast variations.
- Prep Time: 10 minutes
- Cook Time: 6-10 minutes
- Total Time: 16-20 minutes
- Yield: 2 paninis
- Category: Appetizers
- Method: Grilling
- Cuisine: Italian-American
- Diet: Gluten Free (if gluten-free bread is used)
Ingredients
Bread
- Ciabatta, focaccia, or sturdy sandwich bread (about 2 slices per panini)
Cheese
- Mozzarella cheese (generous amount for melting)
- Optional: provolone, parmesan, cheddar (to taste)
Pizza Sauce
- Pizza sauce (enough to spread evenly on bread slices, about 2 tbsp per slice)
Toppings
- Pepperoni slices
- Mushrooms, sliced
- Bell peppers, sliced
- Olives, sliced
For Cooking
- Olive oil or melted butter (for brushing the outside of the sandwich)
Instructions
- Prepare Your Bread: Select fresh, sturdy bread such as ciabatta or focaccia. Slice it about 1/2 to 3/4 inch thick to ensure it crisps nicely without getting soggy.
- Add the Sauce: Spread a generous layer of your favorite pizza sauce evenly over one side of each bread slice to deliver classic pizza flavor in every bite.
- Layer Your Cheese and Toppings: Pile on mozzarella and any additional cheeses you prefer. Then add your chosen toppings, such as pepperoni, mushrooms, bell peppers, or olives, to create the perfect pizza filling.
- Assemble and Butter: Place the other slice of bread on top to form a sandwich. Lightly brush the outside of the sandwich with olive oil or melted butter to help achieve a golden, crunchy panini crust.
- Grill Until Perfect: Place the sandwich in a preheated panini press or grill pan and cook for about 3 to 5 minutes on each side until the bread is toasted crisp and the cheese is melted to melty perfection.
Notes
- Use cold ingredients to ensure even melting and to maintain good texture.
- Don’t overload with toppings to avoid sogginess and difficulty pressing.
- Preheat your panini press for the best golden, crispy crust.
- Experiment with different bread types to find your favorite texture combination.
- Double press after flipping the sandwich for extra crispiness.
Nutrition
- Serving Size: 1 panini
- Calories: 350
- Sugar: 4g
- Sodium: 650mg
- Fat: 18g
- Saturated Fat: 8g
- Unsaturated Fat: 8g
- Trans Fat: 0g
- Carbohydrates: 30g
- Fiber: 3g
- Protein: 18g
- Cholesterol: 45mg
Keywords: pizza panini, panini sandwich, melty cheese sandwich, quick lunch, easy dinner, panini recipe, pizza sandwich, grilled sandwich